Using this workflow after a full day of shooting surf. (1000 shots) I’ve been able to do basic keywording, make quick selections (400 shots), full color corrections and adjustments, cropping and putting on a slideshow (70 best images) on a nice bright 15-inch laptop within two hours. This is with no Photoshop; in fact I rarely use Photoshop at all for most of my photography work anymore.
Note: Aperture and Adobe Lightroom are very similar in purpose and design, although there are some differences; the principles of my workflow are the same in either program.
Edit
Following a shoot I always do some in-camera editing just to eliminate the obvious junk.
Importing the images into Aperture
During this process, I choose to keep the master images on an external hard drive rather than loading up my laptop drive. My entire image library is on a few small 400 GB external drives which is referenced by Aperture. The most important step to me in importing the images is to rename the files something useful. DSC_546637738 means nothing to me and it never will, so I give the files a name like balisurf with a three digit serial and I’ll end up with filenames like balisurf001, balisurf002, balisurf358 etc. These are much more useful to me. Do this now while your just starting the process and you won’t have to look back. These are all choices available in the Import dialog.
Quick selections
While images are importing, I begin to rate them with stars, one star is worth a look, two stars is probably a keeper. I’m looking for sharp images of peak action or other interesting perspectives. I move through pretty quickly since I’m not deleting anything. This can done very easily by moving through the shots with the arrow keys and hitting the + key for each star, the – key takes a star away. Notice the cool (useful) filenames appearing under the thumbnails. You’re already taking control.
Sort and Adjustments
 Now I choose to show only the images with one star or more. (selections) It’s definitely a lot less to look at now if I wasn’t too sentimental during the quick selection process. So instead of 400 RAW files to “work on” I’ve only got maybe 60 now to deal with. Remember: that I haven’t deleted any files and I may never, I’m just not showing them now. I’ll probably look at them again later to make sure I didn’t miss a gem though.
I start the RAW conversion now; this is really where you take both the creative and technical control over the image. Color correction, Saturation, Contrast, Exposure adjustments, White Balance, Black and White happens now.Aperture makes it easy: the adjustment palette is already laid out in the order you need to follow. Remember: none of these changes below are permanent, so you can go back and make changes as many times as you want without ever really effecting the original RAW file. Enjoy the freedom.
1.White Balance: adjust the white balance here if you want for creative reasons or if it’s necessary correct for a colorcast. I generally eye this by looking at the image preview as I make the change.
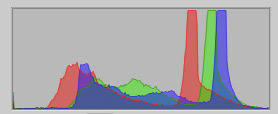
2. Exposure: I adjust the exposure using the slider.Important: I rarely watch the image as I change this, instead focus on the histogram and make sure the hills and valleys begin and end cleanly within the left and right side of the box. No stacking up (clipping) against one end or the other. That means lost details. The ‘mountains’ represents the dynamic range of tones in the image. The left side being the shadows and the right, the highlights, all other tones fall in between these extremes. Within the exposure palette there is also a Recovery slider. This slider helps you bring back highlights that you may have blown out. I sometimes make slight adjustments to the Black Point and less frequently to the Brightness adjustment. Again let the histogram guide you. It knows all.
To become really in tune with the histogram, keep an eye on it through every step of your workflow. See how it changes slightly with almost every tweak you make. Not all adjustments you make are based on the histogram but there is a reason its on your camera's LCD and stationed at the top of the adjustments palette. Learn to love it.
3.Enhance: I usually bump up the saturation to 1.30 and Vibrancy to .15. This makes the colors pop (less or more is a creative choice) and will really show you if your white balance choice was good or not. If not there will be a colorcast that you can fix with White Balance slider back at the top. The contrast and detail sliders are rarely used in my workflow at the moment.
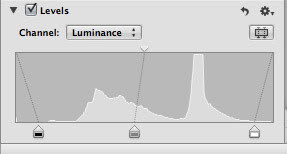
4.Levels: This is sort of the final step for the color correction in my workflow as this is where you'll see the most profound changes in the looks of your image. And here, it’s all about the histogram again. I use the luminance tab for the levels and rarely deal with the RGB levels option mainly because luminance is simpler. Pull the left slider (shadows) over to where it touches the histogram. On the right side, pull the right slider (highlights) over to the where it touches the histogram. This makes a huge difference in the image now. By moving the sliders like I did, I effectively shortened the distance between the shadows and highlights and when that happens you get an increase in contrast. This really defines the elements in your shot.

After just these four steps, the images are now looking like what I saw when I shot them as well as being a good digital image from a technical standpoint. This matters for printing purposes and display on the web. These four simple steps are done pretty quickly after you’ve done it a few times and you’ve learned to use the histogram. At this point, I generally crop the image and /or straighten a horizon if needed. I spend 30 seconds or less on an image.
Lift and Stamp
This seems like a lot of steps to do on every image, but you don’t have to do it that way. If you have a group of shots that are in the same light, exposure (like an action sequence), you can use the lift and stamp tool to copy the adjustments you’ve made on one image to any number of other images that are similar. This makes things move very quickly and efficiently. This tool works for any adjustment you can make including, keywords, captions and cropping. Using the lift and stamp tool gets things done quickly and will also keep sequences with consistent tones and color from one shot to the next.
So here it is again simplified:
- Rename and Import
- Rate images for quick selections
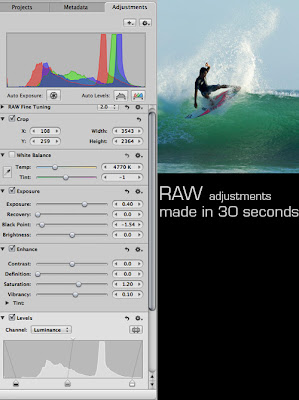
- Adjust: WB, Exposure, Enhancements, Levels and Crop as needed. (30 seconds or less)
- Lift and Stamp Adjustments to similar images.
Of course there are more tools available in Aperture for really fine tuning an image, but its best to "keep things simple" when your just learning and developing your workflow. You don't need every tool in the tool box for most images. The four adjustments above should be the base of your workflow upon which you can apply other adjustments as you become more familiar with your tools.
See the basic adjustments for this shot of Indonesian surfer Komang "Gogo" Sujaya below. click image for a larger version.
 Now you have a nice selection of images that are ready to be seen, export a jpeg, email, print, or just show in a slideshow. You may go back countless times to make additional adjustments, but for now you have something useable to share. Your shots look like they’re supposed to and you can be proud to show them as a skilled digital photographer.


